A number of complaints arising from the users of the Android phone is the battery life is relatively short. As is known, Google's Android complete with a variety of connectivity, which unfortunately requires a high battery consumption. For example, streaming music is the main feature of Android, but that's what causes the batteries run out quickly. If you decide not to do music streaming, then you also would not be able to enjoy this important feature.
Should also know what applications are consuming a lot of batteries. That way you can turn it off when not in use so the battery can be more economical. Some of them:
1. GPS
Use GPS if perlua only. These applications use large amounts of battery power. You can use the Power Control widget to quickly shut down and activate it if needed. To determine the ON / OFF you simply look at the notification bar; a GPS icon will appear if the GPS is active.

2. Bluetooth
Turn off Bluetooth if you do not use it. The quickest way to ON / OFF is to press the Bluetooth widget on the homescreen.

3. WiFi
If the GPS and you should turn off Bluetooth when not in use, then the treatment is slightly different with WiFi. You are allowed to activate the WiFi continuously rather than having to turn on and off periodically. To continue to enable it please go to Settings> Wireless networks> Wi-Fi Settings. Tap the Menu button> Advanced> Wi-Fi sleep policy> Never.

4. Mobile Data
Make sure you turn off the option Always-On the Mobile Data. This menu is active by default, so you have to turn it off yourself. To arrange please go to Settings> Wireless & Networks> Mobile Networks> Enable always-on mobile data. If the active state, then this feature will make the phone you keep connected to the internet. Its function is to obtain a variety of notification, despite the fact that when you turn off that feature, Gmail and GTalk notifications you can still receive. But for other applications that require an Internet connection is definitely Mobile Data must be in active state.

5. Screen Timeout
pilihlah Screen Timeout yang paling tepat. 15 detik barangkali terlalu cepat tapi 1 menit terlalu lama untuk membiarkan screen ponsel menyala. Pilihlah 30 detik. Cara mengaturnya ada di Settings > Screen & display > Screen timeout.

6. Screen Brightness
Screen Brightness on your cell phone does require a special battery power. To make a 30% brightness at the position. Can be set in the Settings> Screen & Display> Brightness.

7. Wallpaper
Wallpaper with 3D animation is a nice view, but remember to move the animation to battery power. We recommend using only satis wallpaper.
8. AMOLED Display
Not all Android phones using the technology of AMOLED displays. But if by chance your Android phone equipped with AMOLED display, then you need to know that the point is to save battery usage. This happens because every pixel on the OLED screen is photoemissive which will have its own source of light. That's why mobile phones with AMOLED Display does not need a backlight and pixel automatically in the OFF state and make it black. As a result, you can save on battery usage.

9. Automatic Updates
Use the appropriate interval for automatic updates. Basically you do not need automatic updates except the emails always want to monitor. You can choose the right time to get automatic updates, you even can set it in the OFF state. If you want to get automatic updates, then set the settings on the longest time interval.

If you use the HTC Android phone equipped Sense, you can get updates for HTC Mail Client, the HTC Weather App, Facebook, Flickr, and Twitter Stocks often as you want. Can be arranged through the Settings> Accounts & sync.

If still in doubt whether you are running applications that require high battery power or not, you can see in the Settings> About phone> Battery> Battery use and tap on an item to find out the details. Good luck;)
Should also know what applications are consuming a lot of batteries. That way you can turn it off when not in use so the battery can be more economical. Some of them:
1. GPS
Use GPS if perlua only. These applications use large amounts of battery power. You can use the Power Control widget to quickly shut down and activate it if needed. To determine the ON / OFF you simply look at the notification bar; a GPS icon will appear if the GPS is active.

2. Bluetooth
Turn off Bluetooth if you do not use it. The quickest way to ON / OFF is to press the Bluetooth widget on the homescreen.

3. WiFi
If the GPS and you should turn off Bluetooth when not in use, then the treatment is slightly different with WiFi. You are allowed to activate the WiFi continuously rather than having to turn on and off periodically. To continue to enable it please go to Settings> Wireless networks> Wi-Fi Settings. Tap the Menu button> Advanced> Wi-Fi sleep policy> Never.

4. Mobile Data
Make sure you turn off the option Always-On the Mobile Data. This menu is active by default, so you have to turn it off yourself. To arrange please go to Settings> Wireless & Networks> Mobile Networks> Enable always-on mobile data. If the active state, then this feature will make the phone you keep connected to the internet. Its function is to obtain a variety of notification, despite the fact that when you turn off that feature, Gmail and GTalk notifications you can still receive. But for other applications that require an Internet connection is definitely Mobile Data must be in active state.

5. Screen Timeout
pilihlah Screen Timeout yang paling tepat. 15 detik barangkali terlalu cepat tapi 1 menit terlalu lama untuk membiarkan screen ponsel menyala. Pilihlah 30 detik. Cara mengaturnya ada di Settings > Screen & display > Screen timeout.

6. Screen Brightness
Screen Brightness on your cell phone does require a special battery power. To make a 30% brightness at the position. Can be set in the Settings> Screen & Display> Brightness.

7. Wallpaper
Wallpaper with 3D animation is a nice view, but remember to move the animation to battery power. We recommend using only satis wallpaper.
8. AMOLED Display
Not all Android phones using the technology of AMOLED displays. But if by chance your Android phone equipped with AMOLED display, then you need to know that the point is to save battery usage. This happens because every pixel on the OLED screen is photoemissive which will have its own source of light. That's why mobile phones with AMOLED Display does not need a backlight and pixel automatically in the OFF state and make it black. As a result, you can save on battery usage.

9. Automatic Updates
Use the appropriate interval for automatic updates. Basically you do not need automatic updates except the emails always want to monitor. You can choose the right time to get automatic updates, you even can set it in the OFF state. If you want to get automatic updates, then set the settings on the longest time interval.
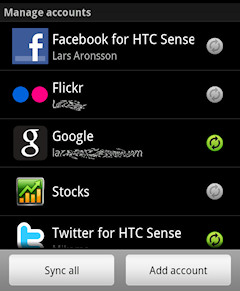
If you use the HTC Android phone equipped Sense, you can get updates for HTC Mail Client, the HTC Weather App, Facebook, Flickr, and Twitter Stocks often as you want. Can be arranged through the Settings> Accounts & sync.

If still in doubt whether you are running applications that require high battery power or not, you can see in the Settings> About phone> Battery> Battery use and tap on an item to find out the details. Good luck;)


